Kale is considered a fantastic super green – for good reason. It is an excellent source of vitamins A, B, C, K, and multiple minerals. It’s no wonder many backyard farmers want to grow kale in their gardens.
And the good news is you can grow it in a hydroponic system. As a crop to cultivate, it is pretty straightforward.
Growing kale hydroponically means you’ll have access to the freshest and cleanest produce all year round, even in really cold climates.
And you will be able to tap into all the benefits of hydroponics, namely that you can micro-manage several environmental elements.
So, let’s talk about the benefits of growing kale in a hydroponic system.
Benefits of Growing Kale in Hydroponics
When growing Kale, you’ll need to utilize either Deep Water Culture (DWC) or nutrient film technique (NFT) systems.
With the DWC method, you could choose a raft or pond culture. Raft and pond cultures are when your seedlings are transplanted into a medium that floats on the water’s surface with the roots dangling beneath.
NFT is where the seedlings are transplanted into shallow channels that flow with a thin film/stream of nutrients.
You can also tap into an ebb and flow system or Kratky, but DWC and NFT systems are the best for kale.
Whatever you choose, if your setup is appropriately monitored, your hydroponic system will help,
- Maximize space for a larger crop
- Conserve water
- Allows for micro-climate adjustments
- Produce a higher yield (more kale)
And,
- There’s no need to purchase expensive soil and additives
- You can produce higher quality food
While some might feel that hydroponically grown produce has less nutritional value, this isn’t the case. Depending on your nutrient solutions, your kale will be brimming with vitamins and minerals.
And with hydroponics, you have complete control over how your plant grows. You can also harvest your kale as an adult plant or a micro-green.
Now that you know you can micro-manage how your kale is grown, let’s talk about the perfect kale growing environment.
Perfect Growing Conditions for Kale
Kale, sometimes called leaf cabbage, is a part of the cabbage family, the Brassica Oleracea cultivars. This family is known for its edible leaves and includes:
- Cabbage
- Broccoli
- Cauliflower
- Brussels sprouts
- Collard greens
- Savoy cabbage
- Kohlrabi
- And Gai Lan
Brassicas are a part of a tough plant family, and kale is no different.
It is said to have originated in the eastern Mediterranean and Asia Minor region, which means it can withstand high heat and low temperatures.
But because you’re growing this crop hydroponically, you don’t need to expose it to the elements.
Kale loves temperatures between 60°F and 75°F, so keep it relatively warm. They are frost resistant and can take temperature dips of -15°F. Sometimes kale has been known for becoming sweeter after being subjected to heavy frost.
Regarding electrical conductivity (EC) levels, which helps your plants absorb more nutrients, you’ll need to ensure it is between 1.6 to 2.5 to achieve the optimum levels.
Bear in mind, kale has a pretty vast EC range for the best results.
Kale requires few nutrients to grow in low doses, at 560-840 parts per million (ppm). As a comparison, tomatoes require 1400-1750 ppm.
Here’s what we recommend for the best hydroponic nutrients
So, this will be an economical crop to grow hydroponically, as you’ll need little to no nutrients to see great results.
For the nutrient solution, water pH should be maintained between 5.5 to 6.5 to ensure the best results. The neutral pH level is going to be pretty easy to maintain. Make sure not to tweak the levels too much.
In regards to lighting conditions, this plant will need full sun. Up to 6 to 10 hours a day. If you are going entirely indoors with this grow, you should use LED lights.
Finding a grow light that produces more red light will ensure that your yield is higher.
Depending on your variety of kale, you could see better results with green and far-red combinations.
However, exposing your kale to too much light can lead to light stress.
Crop rotation for kale is also very forgiving. Kale takes between 55 to 75 days from seed to harvest.
You can expect up to 6 cycles per year from each batch. Transplanting fully-grown kale into the hydroponic system will decrease the harvest timing to 40 days and increase the cycle to nine harvests a year.
Considering that hydroponic kale can live for several years, even up to a decade, it will be providing a constant crop.
Now that we understand the optimum requirements to grow the best kale let’s talk about the setup required.
Kale Hydroponic Requirements
We’ve already said that kale will be happiest in a DWC or NTF system. While you could build your hydroponic system, if you’re looking to purchase one, you’ll be surprised by all the options.
Our top recommendation for a single kale plant would be to purchase a DWC that is a five-gallon bucket.
If you’re wondering which one to choose, we’d recommend the PowerGrow DWC Hydroponic Bucket System.
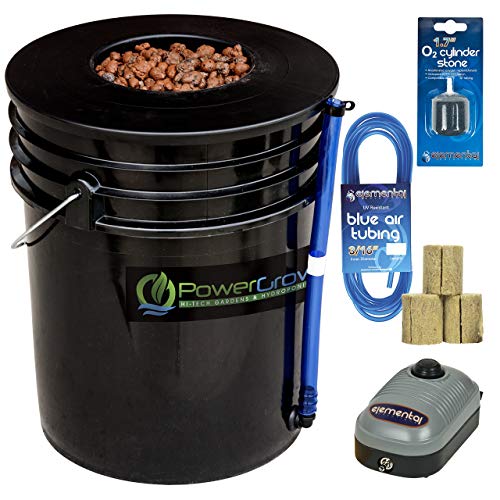
Included in this package are the following:
- Five-gallon bucket with a net pot integrated into the lid
- Air pump
- Air tubing
- Air Stone
- Growing Medium
- And Rockwool seed starting packs
The above list is your basic requirements for a DWC hydroponic setup.
Setting up this system is pretty simple and can vary depending on whether you’re growing outside or inside.
So, let’s go through how to set up a kale hydroponics unit.
How to Set Up a Kale Hydroponic Unit
Selecting A Location To Grow Hydroponic Kale
Selecting the location is your first step. If you’re planning on growing your kale outside, you will need to find a spot that at least gets 6-10 hours of direct sunlight a day.
Gardens with high walls will struggle to provide enough light, so you need to observe how the sun moves over the yard.
Remember, you can mount a five-gallon on a wall to increase its time in the sun. Also, cut back tree branches to maximize the light exposure.
If you’re selecting to go indoors, choosing a well-ventilated room is in your best interest. You can also purchase small fans if you don’t have the luxury of selecting a grow room with great natural ventilation.
Introducing ventilation will decrease the chances that your plant develops mold.
The indoor space should be away from living areas, as the humming of lights and fans can quickly become tiresome.
If you are planning to grow more than one kale plant, make sure there’s enough space for all the leaves to breathe.
Setting Up Hydroponic Equipment For Kale
Now that you’ve chosen your spot, set out your equipment. Make sure to add as much water as recommended by the instructions. With the system we suggested above, you’ll see the level on the side of the bucket. Others might have different instructions about the level.
Now connect the air pump and tube.
When you’ve connected the piping to the pump, thread the piping through the air hole in the lid of the bucket.
Now connect the air stone into place. Plug in the pump and test if the airstone is bubbling as it should.
When you’ve achieved your desired bubble ratio, test the pH levels of the water, the PPM and EC. When you have the right levels it’s time to pot.
If you’ve grown the kale seeds in the ground, your plant could suffer with the transplant. Instead, grow your kale seeds in the provided Rockwool to ensure the best results.
When growing kale with seedling cubes, it is suggested you place 3-4 seeds in the hole to ensure that at least one seedling will grow. Germination to baby plants takes around three to four weeks.
For those who bought seedlings, ensure that the provided net pot is the correct size. Too big or small, and the kale will struggle.
Make sure that you have your growing mix ready. This medium can be Rockwool, exploded stone, coco coir, or hemp fiber. Carefully remove your seedling from it’s whatever it its gorwing in and place into the net pot.
Always ensure that the roots of your seedlings can easily access the water and change out the water every two weeks.
For those growing indoors, you will need to install a grow light. See our top recommendations for the best hydroponic grow lights!
Selecting the correct light matters. We’d recommend going for an LED light panel like the Spider Farmer SF-4000 LED Grow Light, as they can be upgraded and hung up at the correct height.
Make sure that there’s enough room between the light and the canopy of the plants so the leaves don’t burn.
Once the setup is in the correct position, and the plants are taking, you’re on your way to growing healthy kale plants.
So, what have we learned about growing kale hydroponically?
What We’ve Learned About Growing Kale In a Hydroponic System?
Growing kale is a great crop to use to learn the basics of hydroponics. Not only is it easy and forgiving, gardeners will be able to harvest it multiple times a year for up to a decade.
We’d strongly suggest selecting a DWC as kale can grow to a large size. The PowerGrow DWC Hydroponic Bucket System is a perfect starting package and great for kale.
If you need more information about growing hydroponic kale, please feel free to leave your questions below. And we’ll try our best to answer them thoroughly.
And if you’re interested in growing your own hydroponic kale, there’s no better time to start than right now.


